
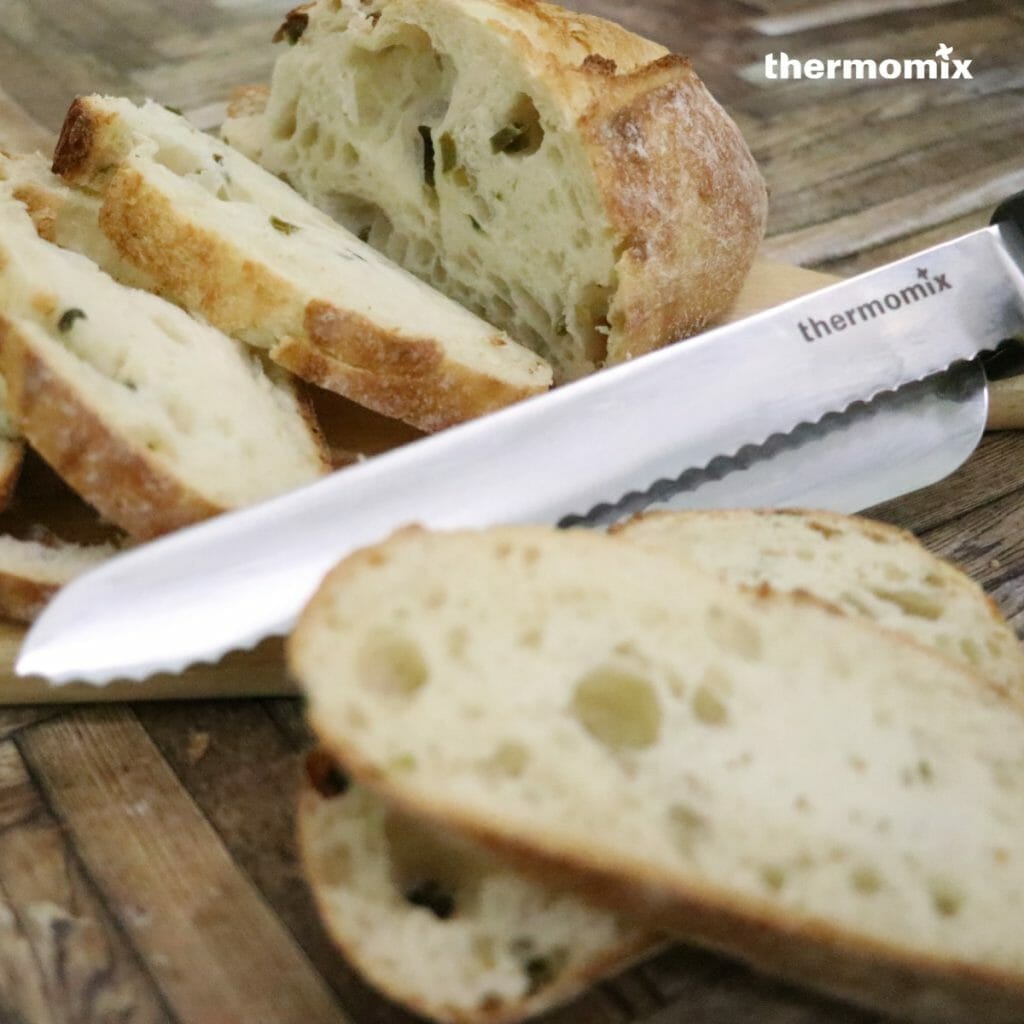
The new, improved Thermomix® bread knife with guide is designed with an adjustable guide for millimetre-perfect slices, so you can cut every slice evenly, from top to bottom, to the exact thickness you like for toast and sandwiches.
Made of high-carbon, high-grade stainless steel, our bread knife is food safe, strong and sharp, with a sliding slicing guide that adjusts from 5mm for super thin crispy toast that’s perfect for pate, up to 25mm extra chunky bread for soups or a super-sized sandwich lunch for hungry kids.
Fresh artisan breads from your favourite bakery will last longer if you keep them whole to slice at home.
Compliment your freshly made Thermomix® bread with the new Bread Knife with Guide.
💚 2022 Edition : New & improved design
💚 Adjustable guide to adjust the thickness of each slice
💚 Made of strong carbon, high grade stainless steel
💚 5mm to 25mm even thickness slices from top to bottom
💚 Ergonomically designed handle for easier grip


Check out some of our favourite bread recipes below :
Killer Toast (click for Cookidoo® recipe link)
Ingredients
- 35 g butter, cut in cubes, plus extra for greasing
- 1 egg, A-sized
- 110 – 120 g fresh milk
- 30 g caster sugar
- 1 tsp dried yeast (5 g)
- 260 g high protein flour (bread flour)
- ½ tsp salt
Preparation
- Grease a loaf tin (19 cm x 10 cm x 10 cm) and set aside. Place a bowl on mixing bowl lid, weigh in butter. Set aside. Break egg in mixing bowl, without tare the weighing scale and top up with milk to 180 g.
- Add sugar and yeast, mix 1 min 30 sec/speed 3.
- Add flour and salt, knead Dough /3 min.
- Knead Dough /2 min, meanwhile, add butter one cube at a time through hole of mixing bowl lid.
- Knead Dough /2 min. Transfer the dough to pastry mat, cover and rest for 10 minutes. Divide dough into 3 equal portions. Flatten dough with a rolling pin into long rectangular shape, and roll into log shape. Repeat the steps for the remaining dough until finished. Transfer into greased loaf tins and proof for 1 hour or until the dough fills up 90% of loaf tins. During the last 10 minutes of proofing, preheat oven to 170°C.
- Bake in preheated oven (170°C) for 40-45 minutes. Remove loaves from tins and allow them to cool on a cooling rack before slicing and serving.
Mexican Coffee Bun / Roti Boy (Click for recipe)
Hokkaido Milk Loaf (click for Cookidoo recipe)
A very soft daily toast bread suitable for sandwiches or to eat simply with good old kaya and butter!
Ingredients
- 90 g sugar
- 1 ½ tsp dried yeast
- 160 g fresh milk
- 140 g whipping cream
- 2 egg whites
- 20 g butter, softened at room temperature, plus extra for greasing
- 500 g high protein flour, plus extra for dusting
- 1 tsp salt
- 30 g full cream milk powder
Preparation
- Place 15 g sugar, 1 tsp dried yeast, milk, whipping cream and 1 egg white in mixing bowl, mix 1 min 30 sec/37°C/speed 2.
- Add 10 g butter and high protein flour, knead Dough /4min. Transfer dough to a large bowl, cover with damp kitchen towel and let it rise in a warm place until doubled in size (approx. 2 ½ – 3 hours).
- Place reserved dough, 75 g sugar, ½ tsp dried yeast, 1 egg white, salt and milk powder in mixing bowl, knead Dough / 3 min.
- Add 10 g butter, knead Dough / 3 min. Transfer dough to a large bowl and let the dough rest for 10 minutes. Meanwhile, grease two loaf tins (19 cm x 10 cm x 10 cm) with butter and set aside.
- Punch down to deflate the dough. Divide dough into 2 portions. Lightly flour a pastry mat, flatten dough with rolling pin and roll up dough to form smooth, non-sticky logs and place them into prepared loaf tins. Cover with damp kitchen towel and let rise again in a warm place until doubled in size (approx. 1 hour) or the dough fills 80% of the loaf tins. Preheat oven to 180°C during the last 10 minutes of proofing.
- Bake for 30-35 minutes (180°C). Remove loaves from tins and allow them to cool on a cooling rack before slicing and serving.
Korean Garlic Cream Cheese Buns
A popular street snack in Korea made easy with Thermomix®
Bun Ingredients
- 180g one Egg +milk
- 1tsp instant yeast
- 30g sugar
- 260 bread flour
- 1/2 tsp salt
- 30g butter
Preparation
- Preheat the oven at 170°
- Add egg, milk, yeast & sugar and mix for 5mins / 37°/ speed 2
- Add the bread flour and salt. Knead for 5 minutes
- Add butter and knead for another 2 minutes
- Divide the dough to small rolls of 50g each
- Shape them into round buns and proof for 45 minutes until each bun doubles in size.
- Bake in the preheated oven for 10-15mins at 170°.
- Set the baked buns aside to cool on a cooling rack
Cream cheese filling ingredients
- 250g cream cheese
- 30g castor sugar
- 50g whipping cream
Preparation
- Add the cream cheese and sugar and mix for 30s at speed 5
- Add whipping cream and continue to mix at 20s / speed 5. Pour out the cream cheese into a piping bag and set aside.
Garlic Butter sauce Ingredients
- 200g salted butter
- 80g whipping cream
- 40g mayonnaise
- 40g chopped Garlic
- 10g honey
- 40g parmesan cheese
- Dried parsley flakes (adjust the quantity to your preference)
Preparation
- Add butter and garlic to dissolve for 2mins / 80°/ speed 2.
- Add the rest of the ingredients and mix for 20s / speed 2.
Assembly
- Cut the cut into 6 to 8 slice of the bread
- Pipe the cream cheese along each sliced cut on the bun
- Dip the cheese piped bread into the garlic sauce
- Bake at 160° for another 10-15mins.