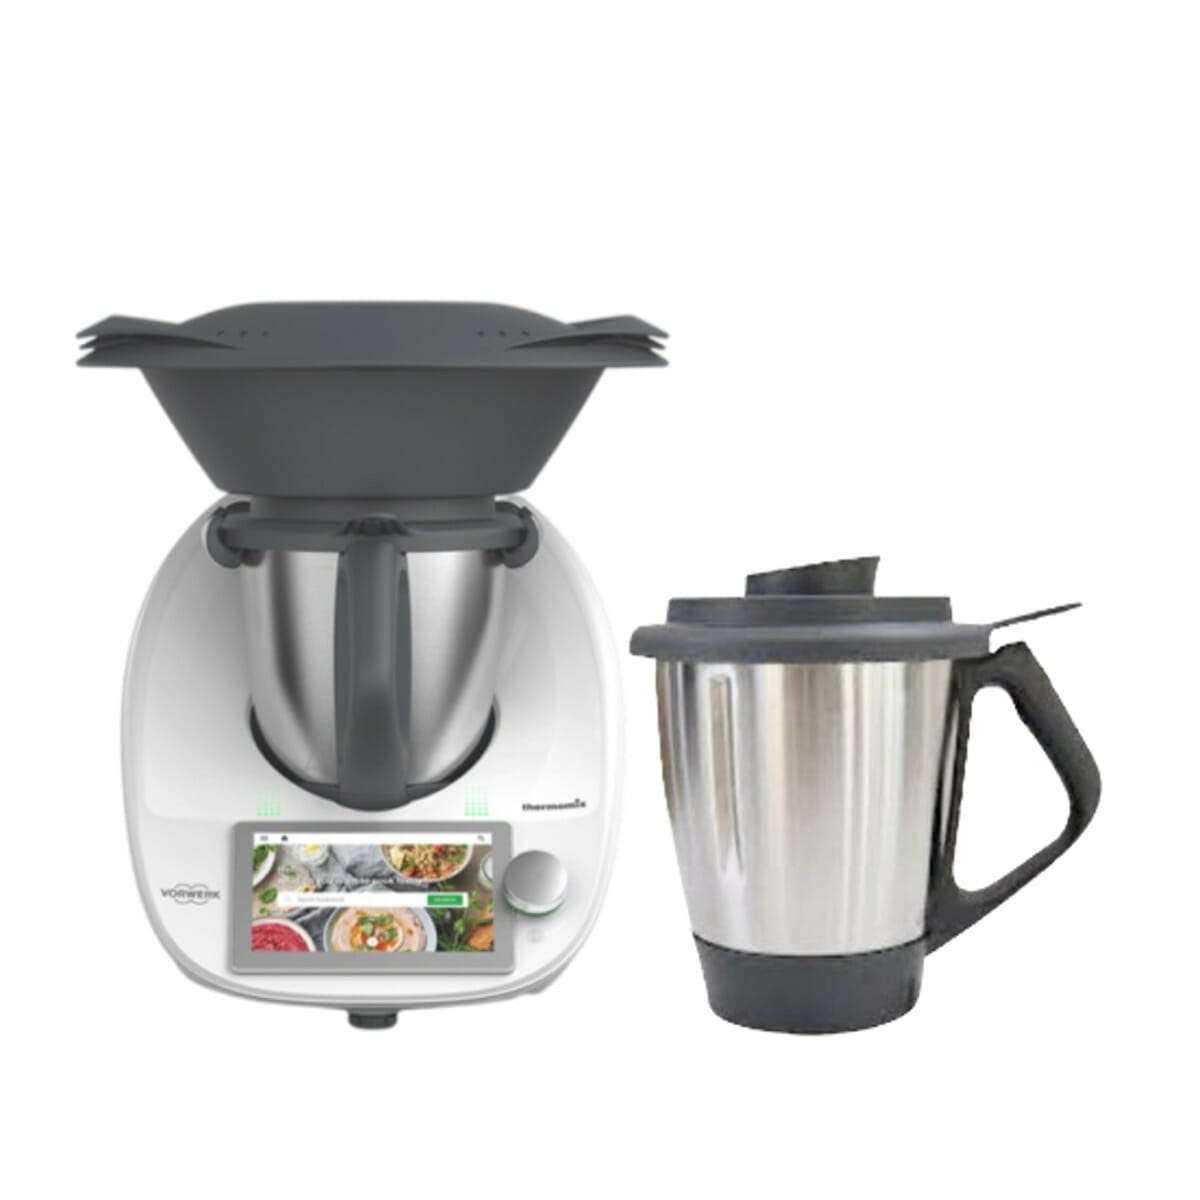
For Thermomix®️ TM6 owners, there’s no better time to get your Thermomix®️ extra mixing bowl.
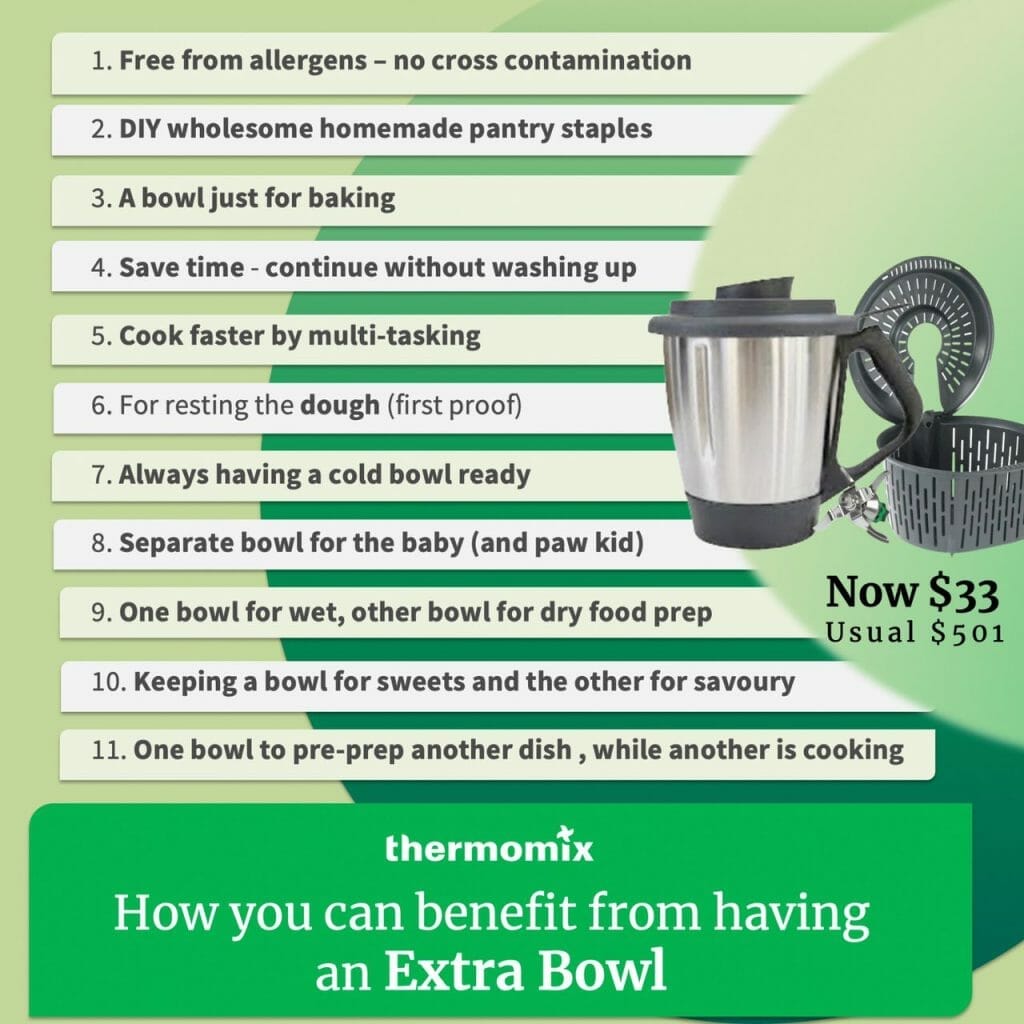
Why do you need an extra mixing bowl? Here are some reasons why having an extra Thermomix®️ mixing bowl is very useful!


1. Free from Allergens
Avoid cross-contamination when cooking for loved ones with special dietary requirements by using one bowl for their special recipes specifically.
2. DIY wholesome homemade pantry staples
Make ingredients from scratch – mill any type of flour (be it rice, almond, wheat etc), icing sugar, spice mixes, or grate block cheeses, make stock powder, pastes and sauces on-demand or in bulk to add extra special oomph to your dishes.
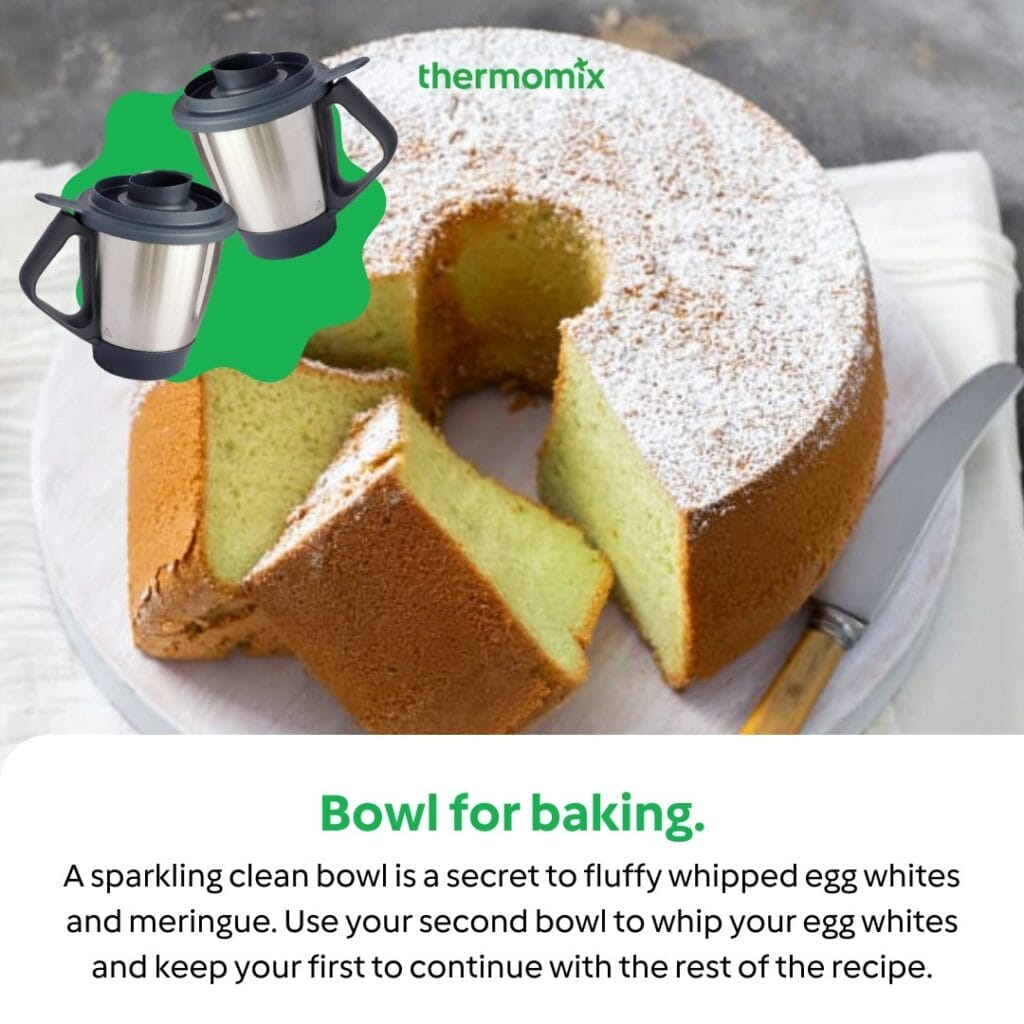
3. A bowl just for baking
A sparkling clean bowl is a secret to fluffy whipped egg whites and meringue. Use your second bowl to whip your egg whites and keep your first to continue with the rest of the recipe.
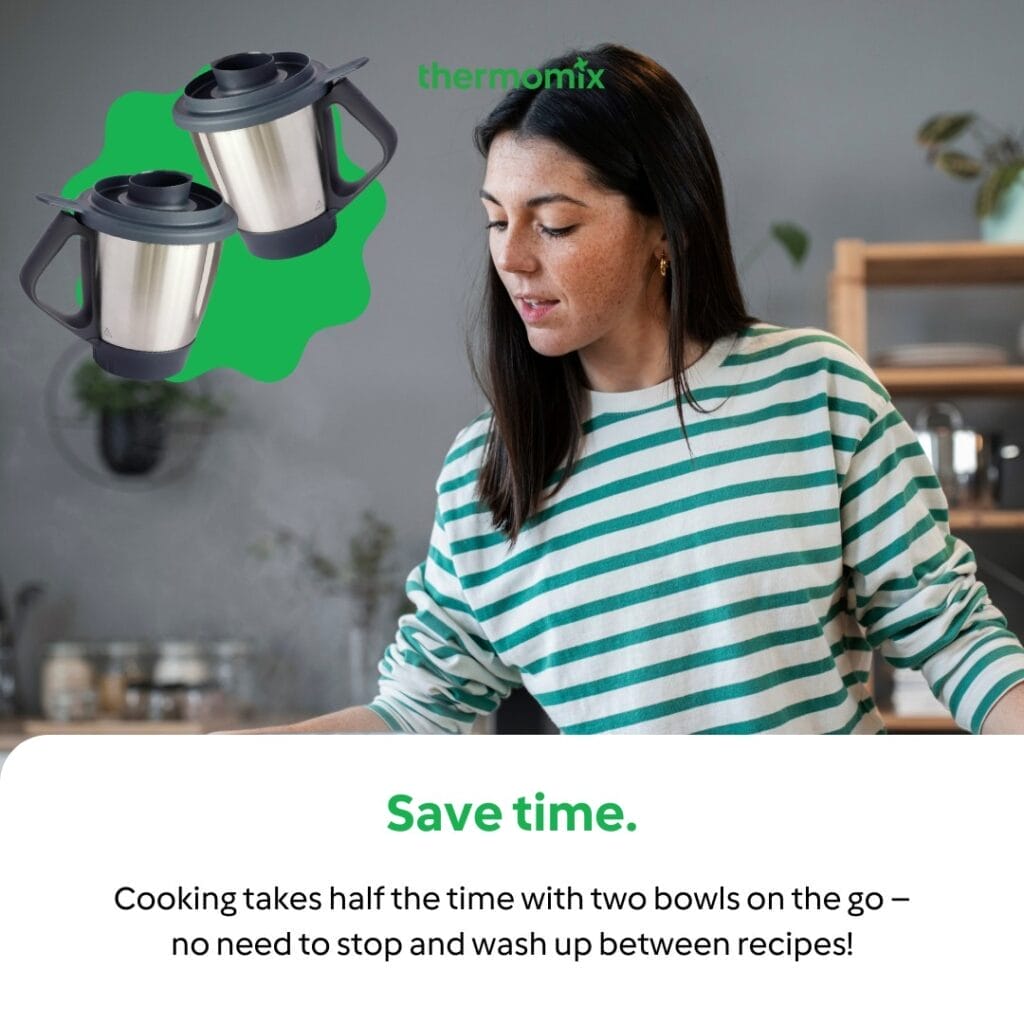
4. Save time
Double bowls is like having more pots and pans. Cooking takes half the time with two bowls on the go – no need to stop and wash up between recipes!
5. Cook faster during busy work weeks
Meal plan for busy work week with batch Cooking in one day for the week, optimized for your convenience.
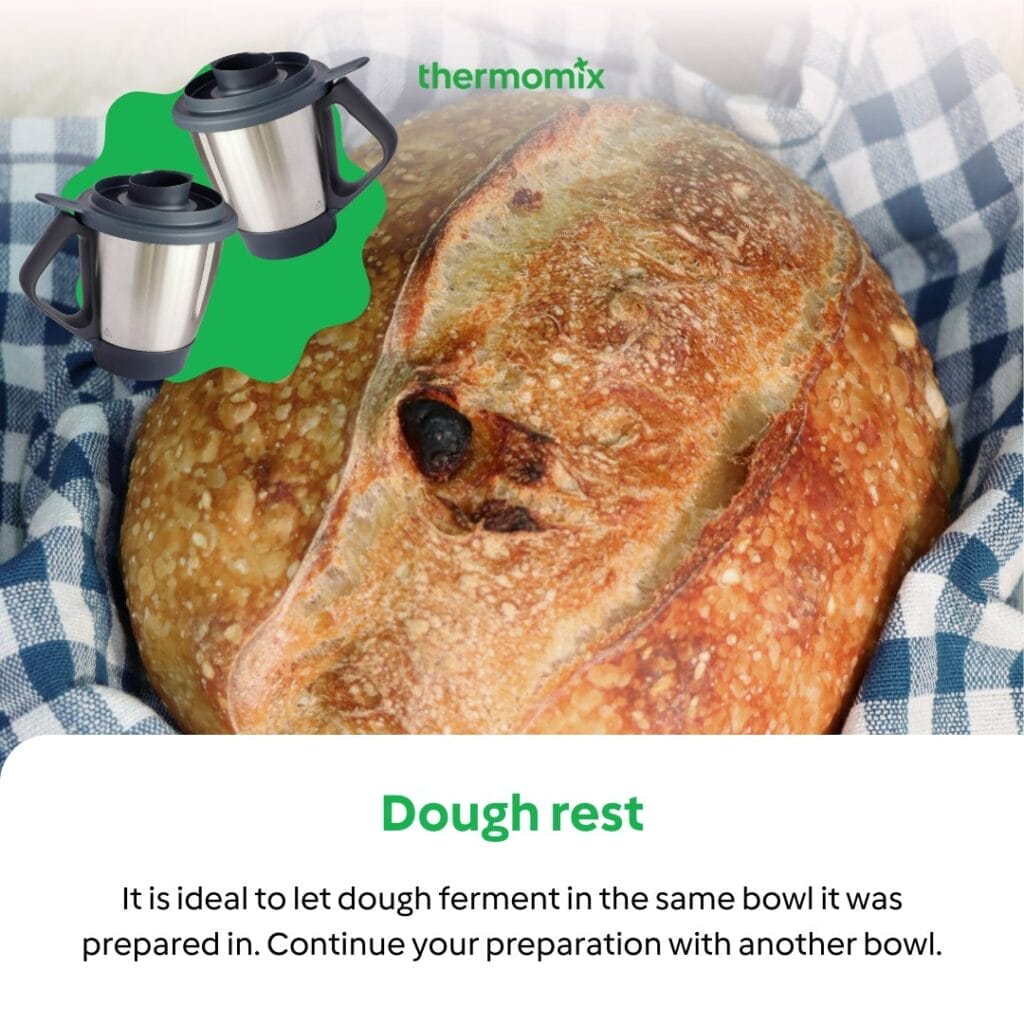
6. Dough rest
If you look at all the elaborations of fermented doughs, bread, pizza, brioche, the ideal is to let the dough ferment inside the bowl in which it has been prepared. Knead after the initial proofing as a punch down for final proofing!
7. Always having a cold bowl ready
Recipes like whipping cream, blending a smoothie and frappe, will require the bowl to be cold to obtain an optimal result. Say goodbye to having to wait for the bowl to cool down after use.
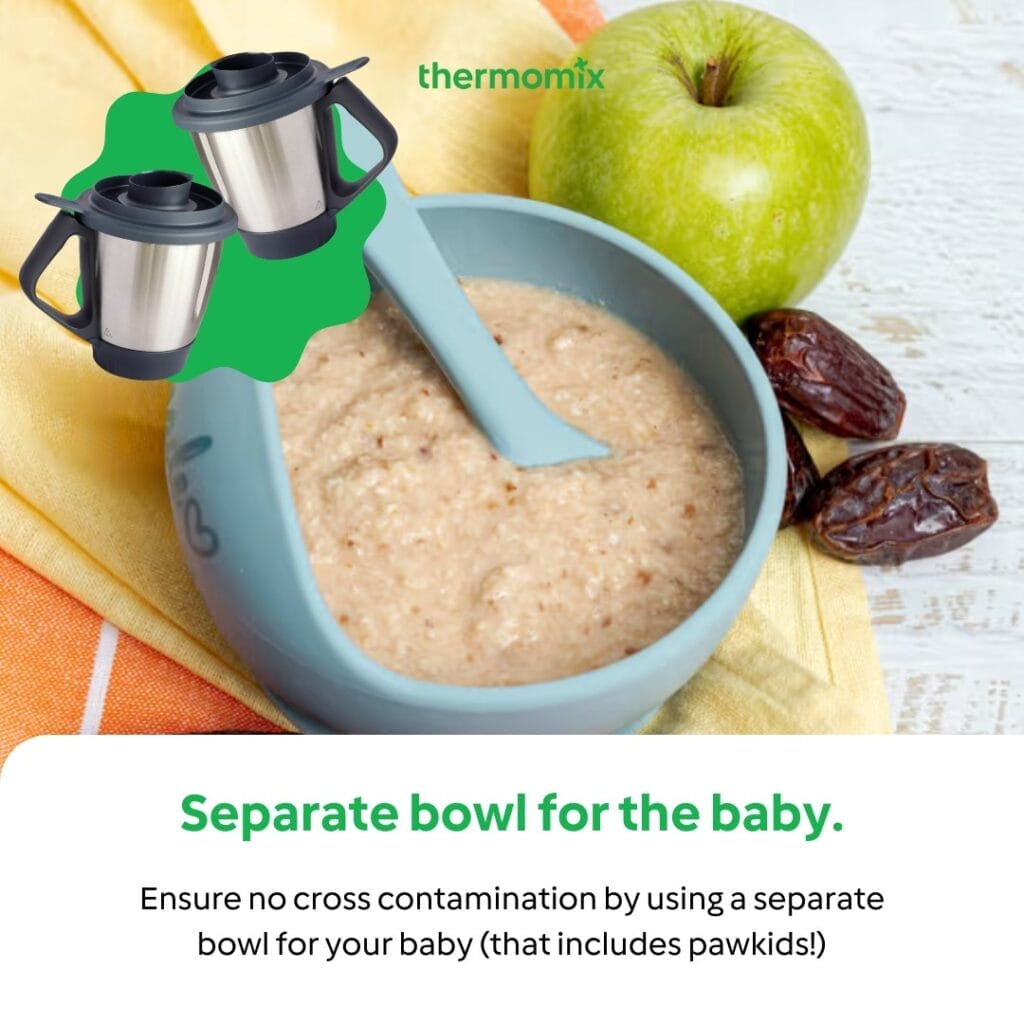
8. Separate bowl for the baby (and pawkid)
Keeping a bowl separate for the little one or pawkid ensures there is no cross contamination.
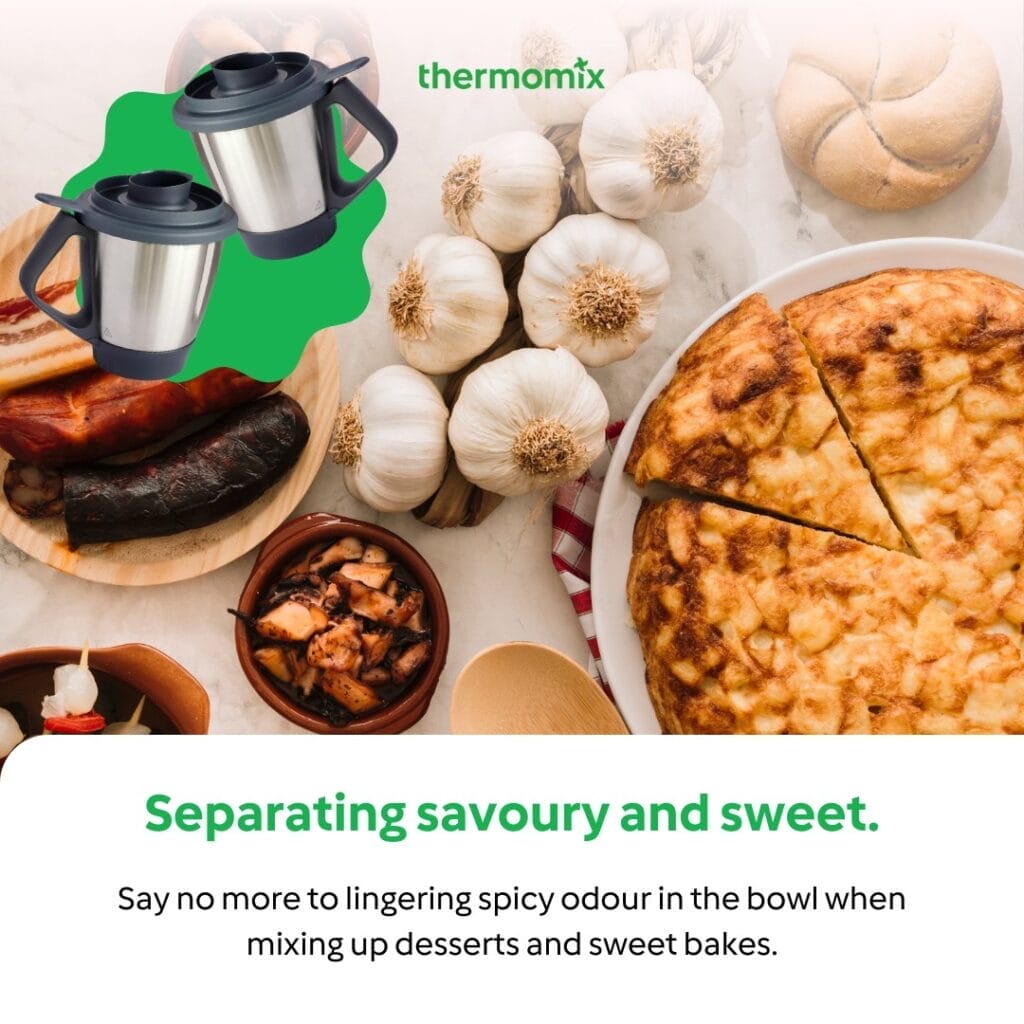
9. Keeping a bowl for sweets and the other for savoury
No lingering spicy odour in the bowl when mixing up desserts and sweet bakes.
Thinking of getting a Thermomix®️ TM6?
There’s no better time to get your Thermomix®️ TM6 – the world smartest kitchen all-in-one multi-cooker. Check out the latest Double Bowl promotion.
Double bowls, double joy. Recipes best with 2 bowls
Click to access each recipe on Cookidoo®️. More about Cookidoo®️


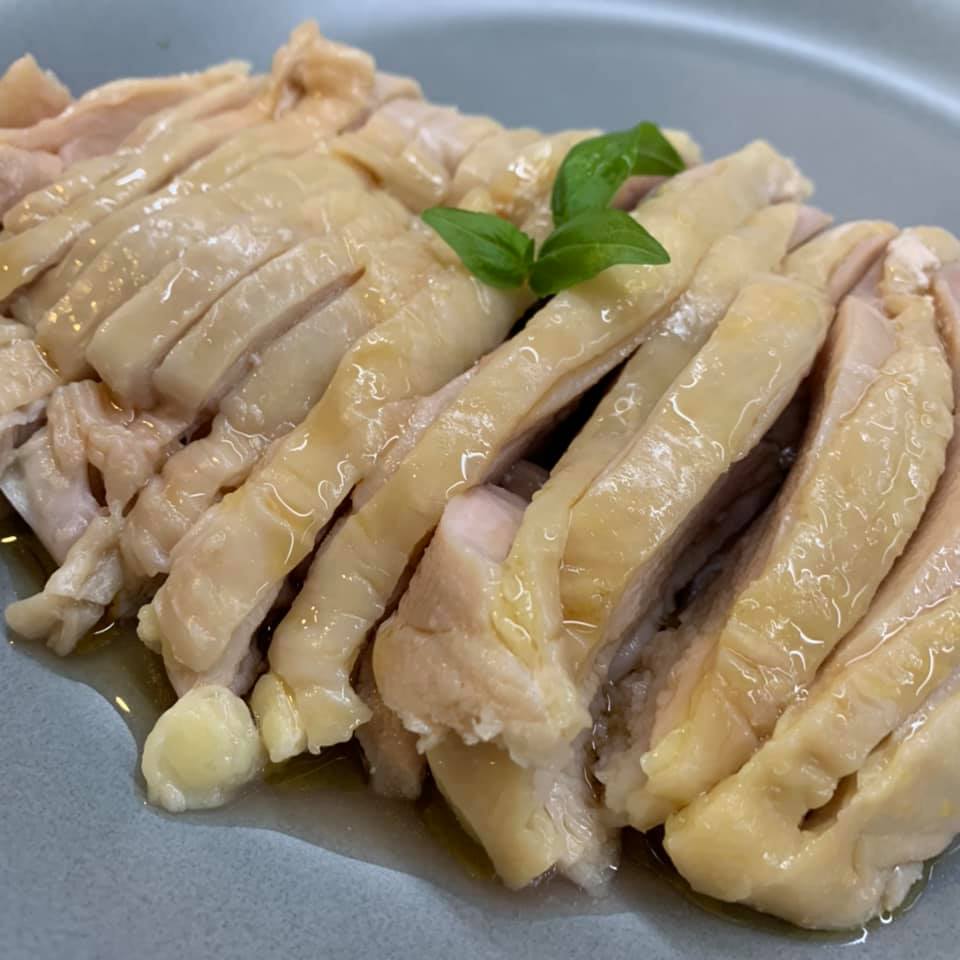
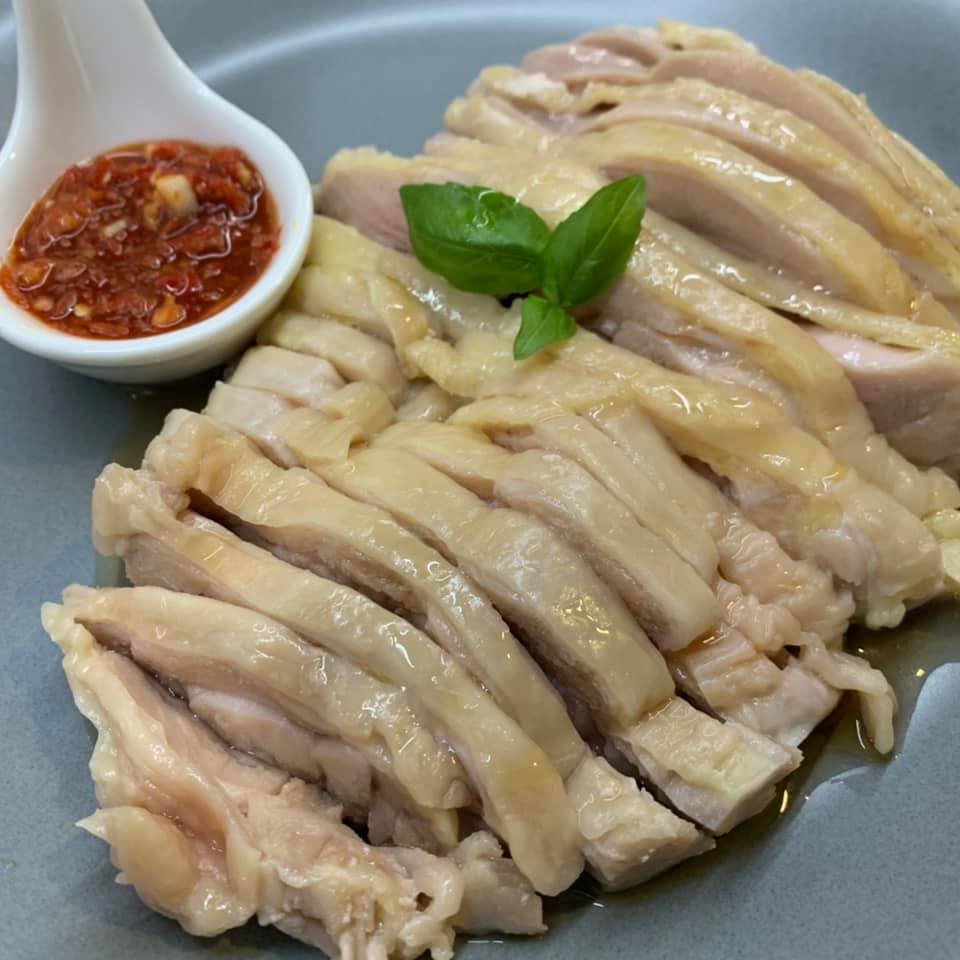
Healthy Sous Vide Chicken (Hainanese-style crystal chicken)
Do you know you can home-cook crystal skin chicken using Thermomix®️ and the sous vide cooking mode? Slow sous vide cook chicken yields tender and succulent texture and a crystal-like skin similar yet simpler cooking in one pot with Thermomix®️ compared to the tedious traditional method of stove cooking where the chicken is dunk in and out of hot and cold water.

Ingredients
- 500 g chicken legs, skin on (approx. 2 legs), deboned (see tip)
- Useful tools : reusable sous vide bag or freezer-safe ziplock bag
- 1.8kg water
- Eggs (optional if you like onsen eggs)
- Cucumber slices as condiment
- Chinese parsley for garnishing
- Chilli sauce (see below)
- Ginger garlic sauce (see below)
Preparation
- Place each chicken slab into a sous vide bag, vacium sealer or air removed using the water displacement method
- Insert the Blade Cover Peeler or Blade Cover into the mixing bowl on top of the blade, add water and place the bags into the mixing bowl above the Blade Cover (Peeler)
- Insert whole eggs into ziplock bag (2 per bag) and place alongside the chicken
- Set Sous Vide 2h / 62 deg Celcius
- Remove the bags, slice the chicken and place the chicken on top of cucumbers
- Season the chicken generously with fish sauce and sesame oil
- Crack the eggs and serve with the chicken rice
Source: Thermomix®️ Truly Asian (click for original post)
Chicken Rice
Ingredients
- 50g garlic cloves
- 20g ginger
- 20g shallots
- 50g sesame oil (or chicken fat)
- 2 TBSP Chicken stock powder
- Chicken skin (optional)
- 1kg water (adjust to 800g water if quantity of rice increase)
- 250g (or 300g) jasmine rice
Preparation
- Add oil (and chicken skin) and aromatics, cook 4min / 120c / speed 1
- Remove the mixture and set aside
- Add water, insert the rinsed rice in simmering basket
- Heap the stock powder and cooked mixture on top of the rice
- Cook the rice for 20min / 100 deg c / speed 3.5
Chicken Rice Ginger Garlic Sauce
Ingredients
- 120 g fresh young ginger, peeled and cut into pieces
- 40 g shallots
- 100 g oil
- ½ tsp salt
Preparation
- Place ginger and eschalots into mixing bowl and chop 5 sec/speed 7. Scrape down sides of mixing bowl with spatula.
- Add oil and salt and blend 20 sec/speed 8.
- Scrape down sides of mixing bowl with spatula, then cook 5 min/100°C/speed 2. Transfer into a bowl and allow to cool. Serve with rice and chicken (Hainanese chicken). Do not clean mixing bowl.
Chicken Rice Chilli Sauce
Ingredients
- 100 g fresh long red chillies, trimmed
- 20 g fresh young ginger, peeled
- 30 g garlic cloves
- 100 g white vinegar
- 1 tsp salt, to taste
- 2 tsp sugar, to taste
Preparation
- Place chilli, ginger and garlic into mixing bowl and blend 5 sec/speed 7. Scrape down sides mixing bowl with spatula.
- Add vinegar, salt and sugar, then blend 1 min/speed 6. Adjust salt and sugar to taste. Transfer into a separate bowl. Serve with chicken rice
Frappe (Thermomix®️ Cafe-Style Iced Blended Coffee)
Why spend over $6 on frappe when it only takes seconds to blend your own at home with your Thermomix®️?
Check out this quick and easy Thermomix®️ recipe.

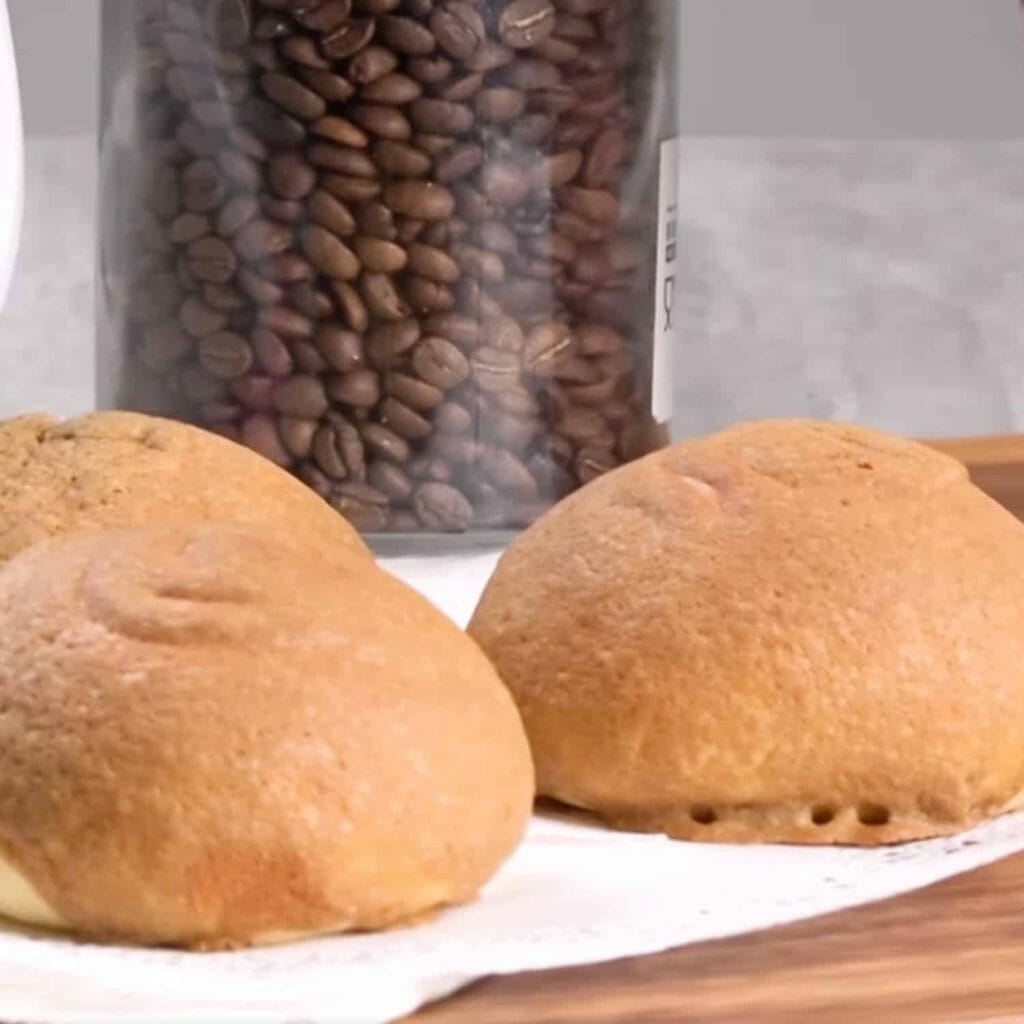
Thermomix®️ Coffee Buns (Roti Boy)
Nothing smells more heavenly than freshly baked bread. With Thermomix®️, bread baking is never easy with success guaranteed! Hands-free kneading in just minutes for perfectly kneaded dough every time, so you can just focus on being creative with different types of bread. Click for our most popular coffee bun Thermomix®️ recipe.
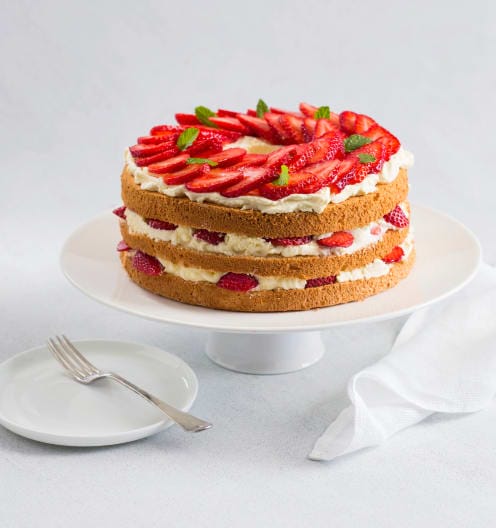
Thermomix®️ Angel Cake
This light cake, although is not a beginner’s cake, is made easy with Thermomix®️ and the whipping function! Get the fail-proof guided recipe using Cookidoo®️ here.

Ingredients (cake)
- 125 g self-raising flour
- 220 g icing sugar (see Tips)
- 12 egg whites (approx. 400 g)
- ¼ tsp salt
- 1 ½ tsp cream of tartar
Ingredients (Vanilla mascarpone cream and assembly)
- 250 g mascarpone cheese, softened and cut into pieces
- 500 g pouring (whipping) cream, chilled
- 30 – 40 g icing sugar (see Tips)
- 500 g strawberries, trimmed and cut into thin slices (3-4 mm)
- fresh mint leaves, for decorating
Preparation ~ Cake
- Preheat oven to 170°C.
- Place a bowl onto mixing bowl lid and weigh flour and 120 g of the icing sugar into it. Combine and set aside. Place a separate bowl onto mixing bowl lid and weigh remaining 100 g icing sugar into it, then set aside.
- Insert butterfly whisk. Place egg whites into mixing bowl and whip 1 min/speed 3.5, without measuring cup.
- Add salt and cream of tartar and whip 4 min/speed 3.5, without measuring cup.
- Whip 1 min/speed 3.5, adding reserved sugar 1 teaspoon at a time through hole in mixing bowl lid. Remove butterfly whisk and transfer mixture into a large bowl.
- Gently fold 3 tablespoons of the reserved flour mixture into whipped egg whites until combined, taking care not to over mix. Repeat until all of the flour mixture has been added and combined. Transfer cake batter into a chiffon cake tin (26 cm – see Tips), smoothing surface with spatula.
- Place on lowest shelf of oven and bake for 45 minutes (170°C). While still in tin, invert cake and leave to cool completely over a wire rack (approx. 4 hours – see Tips). Clean and dry mixing bowl and butterfly whisk.
Preparation ~ Vanilla mascarpone cream and assembly
- Insert butterfly whisk. Place mascarpone and cream into mixing bowl and whip until soft peaks form/speed 4.
- Add icing sugar and whip 15 sec/speed 3. Remove butterfly whisk.
- Place a bowl onto mixing bowl lid and weigh 200 g of the strawberries into it and set aside. Place a second bowl onto mixing bowl lid and weigh remaining 300 g strawberries into it. Set aside.
- Once completely cool, carefully remove cake from tin by running a palette knife along the inside edges of the tin (along the outside of the cake and the inner ring). You may also need to use the palette knife to loosen the cake from the base of the tin. Cut cooled cake horizontally into 3 equal layers.
- Place 1 layer onto a cake stand or serving plate. Spread with one-third of the Vanilla mascarpone cream. Top with half of the strawberries from the 200 g bowl. Gently place second layer of cake over strawberries and spread with another one-third of the cream. Top with remaining half of strawberries from the 200 g bowl. Top with final layer of cake and spread with remaining cream. Decorate with remaining 300 g strawberries and mint leaves, then serve.
Follow us for the latest updates, free recipes and cooking tutorials!